New to Quilting?

If you are brand new to quilting and don't know where to begin, start with the posts in September 2011 (look in the blog archive). The first four posts cover basics such as choosing equipment, choosing colors, how to sew 1/4" seams, how to use a rotary cutter, and how to press (not iron) your block during construction.

Sunday, November 27, 2011

November - Quilt Block Tutorial

November's block, a modified Friendship Star.

Here are the directions for the November block.

Click on the image and print from your browser


November Block Photo Tutorial
The letters in parenthesis are the fabrics I used following the directions above.

Choose four fabrics. From left to right: green (fabric C), red (fabric D), tan (fabric A), poinsettia (fabric B).


Making the Half-square Triangle Units
We are using Method 2 (found in the Half-Square Triangle Tutorial post) to make the half-square triangles.

If you look closely you can see that I have stacked my background fabric (A) and my main fabric (B)  right sides together. Cut a 7" square. This way I don't have to align my fabric as I do if I am cutting two separate pieces of fabric.

Sew a scant 1/4" seam all around the outside edge of the two pieces of fabric (that are still stacked right sides together).

Cut from corner to corner twice to end up with four half-square triangles.

Press open towards the dark side.

Square up the half-square triangle sub-unit to 4 1/2". Remember to align the 45˚ mark on your ruler with your diagonal seam so that your finished block will have a seam that goes from corner to corner. 
One of the benefits of making the half-square triangle units using two squares is that since my fabric is plaid the stripes are all going the same direction in the units. If I had cut smaller squares and drawn the diagonal line through the center (Method 1 in the Half-Square Triangle Tutorial), the patches would have had the stripes going in different directions. That can be kinda annoying for some people!

Sewing the Four-Patch Units
You should already have your strips sewn from the last post on strip piecing. If not, click here.

Take two pieces of the two-patch strip, line them up so that the colors are opposite (see photo) and the center seams nest together.

Not sure about nesting seams? Click here and visit this page  at Creative Collaborations blog or view a YouTube video linked at the bottom of this post.

Pin where the center seams match, and at the edges.
Sew a scant 1/4" seam.

I chain piece mine together, you can see the little bit of thread connecting the four-patches.
 Need a refresher on chain sewing? Visit this post and view the last video.

Press the four-patches open. You should have (5) four-patch units. 

Trim the four-patch unit to 4 1/2". If your seams are accurate and your cutting is accurate, you probably won't have to trim. I had to trim a little on 4 of the 5 blocks.

Putting the Block Together
Line up all your patches in the order you will sew them. These are lined up on my design/pressing board so I can easily move them around without changing the orientation of any of the units. I placed the center column of sub-units close to the left column of sub-units because I will chain sew those together first.
Look at this post to learn how to make your own design/press board.

Press towards the half-square triangles (or towards the four-patchs, but be consistent).

Sew the right column of units onto the center column of units. Press towards the half-square triangles (or the four-patches, but it should be towards the same unit as you did in the previous photo).

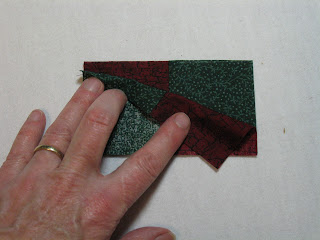
Line the columns up and nest the seams. It is a good idea to pin where the seams match (and are nested). Press seams towards the outside or the inside, or 'twirl' them open at the where the units meet (that's what you see in the photo above). 

I like to 'twirl' the seams open. You have to clip the little thread and open the seam slightly in order to press it like that. You will notice tiny four-patch looking area where four units meet.

A final press from the front and you are all done!
Below is another block made with exactly the same units, it's called either Wagon Tracks or Jacob's Ladder (same exact block, different name). You can see Wagon Tracks at Quilter's Cache-Wagon Tracks or Jacob's Ladder at AZ Patch.  This block has (5) four-patch units and (4) half-square triangle units just like our November block. The two differences are: Jacob's Ladder has only two (or three) colors and the direction of two of the half-square triangles is different.

This is Jacob's Ladder from AZ Patch's 2009 March Block of the Month 
Julie K. Quilts has a bunch of Wagon Tracks laid out in the second photo of this link.

If you want your star to really stand out in the quilt block, cut (1) 4 1/2" square of your B fabric or one of your C or D fabrics instead of using a four-patch unit for the center of the block. Then the name of the block changes to Friendship Star Variation. You can see it here.

Friendship Star Variation
Remember to send me photos of your finished block (with or without you in the photo) so I can use them in a Show and Tell post! Each block turns out so differently and we all love to see how your color choices change the look of the blocks.

Abracadabra Quilting Tips and Tricks: Nesting Seams

Saturday, November 26, 2011

Strip Piecing (New Skill)

To get ready for our next block you will need to know how to strip piece. You can sew the four-patch units the 'old-fashioned way' by cutting out each individual piece and sewing it together, but it is much easier to cut strips of fabric, sew them together, slice them, and then re-sew them into the four-patch unit we will need.

I know it sounds like more work, but trust me, it is not only much less work, the finished sub-units are more accurate.

Strip piecing is cutting long strips of fabric and sewing them together. Then cutting the sewn strip into smaller pieces to get them ready to sew into a block or a unit. You can sew any number of strips together, then cut them apart and re-sew them into new designs.

The easiest strip set to make contains only two strips, which is what this tutorial will show.

Cutting the Strips
For our November block we need strips that are 2 1/2" x 26". My ruler isn't long enough to cut a 26" strip. Although I can fold my fabric in half (I'll show you how later in the post), I wanted to show you how I make a longer ruler.

Line two rulers up end to end (the top two rulers in the photo are lined up end to end)
Use another ruler or the edge of a table or any straight edge to make sure that the first two rulers are perfectly aligned along one edge (the ruler at the bottom of the photo is my straight edge making sure that the two rulers on the top are perfectly aligned).

Place a piece of Scotch (or other clear) tape on the matching edges of the top two rulers. If you look closely you can see a piece of scotch tape along the ruler edges in the photo above.
That's it! Now you have a longer ruler than you started with. Since the edges are aligned there is no chance to get a nick in your cutting blade by running the cutter into the spot where the two rulers are connected. And if you are cutting long pieces of fabric, you don't have to move your ruler, you can just move your hand along the ruler, which helps keep your cuts even along the length of the fabric.

Now you can cut a 2 1/2" strip.

OR:


Here is how you cut a strip from a piece of fabric that is folded in half. The fold is on the right side in the photos.

First you will need to 'square' your fabric, which means you need to make sure that the cut edge of your fabric is 90˚ from your folded edge.

Line one of your ruler marking lines along the folded edge of your fabric.
Chances are the cut edge will not be the same width all along the fabric below the ruler (which is why we are squaring it up), it will probably be narrower at one edge and wider at the other. Match the bottom of your ruler with the shortest spot of the fabric and trim the excess fabric. 
Once your fabric is squared up, line the ruler marking line along the edge of the fabric and the measuring marks 2 1/2" from the edge. See photo.
Cut along the ruler and you will have a 2 1/2" strip of fabric.

Press the strip to get rid of the fold. If you have cut a folded, squared-up piece of fabric you won't be able to see where the fold was. If you didn't square up your fabric properly you will see a small V shape where the fold was. (The scissors are pointing to where the fold was.)


Strip Piecing
Place two strips right sides together and pin if necessary.

Sew a scant 1/4" from the edge of the fabric.

Press the seam flat before you press it open. It helps to set the seam and it helps the fabric on the bottom 'stick' a little to the ironing board which makes it easy to press the strip open.

Whatever fabric you have on top when you press the seam open will have the seam allowance pressed towards it. In the photo above you can see the green fabric is on top, in the photo below the seam allowance is pressed towards the green fabric.

Press the seam towards the dark (or in this case green) fabric.


Cutting the Sub-units
Time to cut the end off the strip so it is at a 90˚ to the center seam (NOT THE BOTTOM EDGE!)
Line one of the ruler lines up with the center seam of your strip, trim the end of the strip so that it is straight.

Flip your strip the other direction so the straight trimmed edge is on your left (if you cut with your left hand, reverse the strip direction in this and the previous photo.)

Because I get distracted and often cut pieces, strips, units (you name it!) the wrong dimensions, I use a piece of colored tape on the ruler line that I need to line the cut edge of my fabric up with. In this photo the pink tape is on the 2 1/2" line.
Make 10 cuts to end up with 10 two-patch rectangles.
I use Glow-line Tape by Omnigrid. One package lasts for years... and years.... and years... I bought 2 rolls about 6 years ago. I estimate that I have about 60 years worth of tape at the rate I use (and re-use) it.

For the November block you will need 10 pieces cut from the strips to sew back together to form the Four-Patch sub-units.

Here is a short, one page tutorial on strip piecing a four-patch block.
Quilt University: Making 4-patch unit

Now that you know how to cut and sew accurately, sew half-square triangles, and strip piece you can make hundreds of different blocks!

Please leave a comment if I haven't explained something clearly enough or if you need photo(s) of a step that I haven't included. I would really like to have this be a resource you can follow along easily.

Friday, November 25, 2011

Design and Pressing Board

I like having a small board that I can use to put the pieces of my block on and move from cutting table to sewing table to ironing board. If I don't use it, I accidentally rearrange pieces and end up sewing them together in the wrong order or the wrong direction.

What you need:

  • An old cork bulletin board
  • Screwdriver or needle nose pliers (to remove the staples on the back of the board)
  • Scrap of flannel (or fleece)
  • Packing tape (or a stapler that you can open and staple flat)
  • Ruler
  • Utility knife

Here's how I made my portable design and pressing board.

An old cork bulletin board from DI that cost $2.

Remove the frame. (Any ideas on what to do with the frame? Leave a comment--I'd love to re-purose this, too!) I used needle nose pliers to pull the staples out of the back of the board that attached it to the frame.

The bulletin board was 17" x 24". Since I wanted my board to be square I used a ruler and made two marks at 17" from the edge (you can see the marks above and below the ruler). 

You could leave the bulletin board a rectangle and fit the flannel without cutting the board. Mine is a square because this size fits on the end of my sewing table easily.

I lined my ruler up along the two marks and used a utility knife to cut through the cork and backing.

I threw away the smaller piece (gasp! I threw something away!) You can see how nicely this size fits on the side of my sewing table.

I traced around a piece of flannel, cut about 1 1/2" from the line, and serged the edges. You don't really have to serge the edges, but I think it keeps the fabric from fraying while I'm taping it to the back of the board. 
 I also have a larger board made from fleece and foam core board, but when I use it as a pressing surface I am very careful to press gently and for short amounts of time because I'm concerned that the fleece (which isn't cotton at all) will melt if I heat it too long. As long as I've been careful I haven't had any trouble with it.

When I made the fleece board I used a spray adhesive to attach the fleece to the board so there wouldn't be any bulk on the back of the board to prevent it from laying flat on the table.

First I taped the corners because I wanted the corners to be neat. It isn't really necessary, but I think it makes the corners lie a little flatter.

Next I taped along the center of each side working on opposite sides, not taping clockwise, so I could stretch the flannel evenly.


I used a pair of scissors to tuck the side edge down before I taped near the corners. I don't really think you have to be that neat, but if I'm taking photos of my work I thought I should probably make my work as nice and neat as possible.

Finish taping the sides. You could probably staple the sides if you don't have packing tape.

All ready to use! The lint roller is part of my sewing room equipment. When my design/pressing board gets too many pieces of thread stuck to it I run the lint roller across and it is as good as new. That's especially helpful when changing from light fabric to dark fabric.
I love my portable design and pressing boards. I use one size or the other every time I am making a block. I love being able to set up my pieces on the board at the cutting table and then move them to the sewing table without the possibility of them being accidentally rearranged. I love being able to take the partially sewn block to the ironing board and press without changing the orientation of the sub-units that I've just sewn.

I don't need any padding under the flannel to use it as a press board. I find the less 'puffy' the pressing surface is the crisper the open seam is when I am done pressing.

This little piece of equipment has saved me time and frustration. I rarely sew a sub-unit into the block in the wrong direction, which means I spend less time picking out seams and re-sewing them.

Monday, November 14, 2011

Freda's Hive Blog

I found this blog the other day and I thought I would do a post on it.

Freda's Hive is written by Nanette Merrill from Alpine!


It was nice to find a quilting blogger so close by.

Click on the link above (where it says Freda's Hive) to visit. 

Here are some of the things you will find on her blog:

Scroll down and look on the right side of her blog. This is a list of tutorials and patterns!
If you click on the link that says, 'PDF blocks for "That Alpine Group" 2009' it will take you to a page that has 47 different photos and PDFs of blocks and projects.
Scroll down a little further and you will find a HUGE list of blogs that she reads! (The screen shot above only shows blogs titled A-C, the list is much, much longer!)
 I've only visited a few of them. So much fun! So many ideas! 
I hope you take a minute to look at Freda's Hive. She has great photos and some wonderful quilts and projects in progress.

Friday, November 4, 2011

Shoo-fly Quilt Block Tutorial

Shoo-Fly Block


Here are the instructions for the Shoo-fly block that were given out at the class last month.
Click on the image to view it full size. Then print from your browser window.

Coloring blocks to go along with the instructions.
Click on the image to view full size. Then print from your browser window.

Instructions to follow the photo tutorial (if you want a printed copy)

I made my block a traditional Shoo-fly layout. Feel free to experiment with color combinations and different layouts. That's part of the fun of quilting!

This block was first published in 1898 by Ladies Art Company. There is a great little article about the Shoo-fly block at Suzy's Fancy.

Shoo-fly Photo Tutorial
The photos follow the Traditional Instructions above. The only difference between the first set of instructions and the traditional instructions is the color placement.

Step 1: Cut out your fabric

Fabric A: Cut four 4 1/2" squares.
                 Cut two 5" squares OR cut one 7" square
Fabric B: Cut two 5" squares OR cut one 7" square
Fabric C: (center square) Cut one 4 1/2" square

From left to right: Fabric A (four 4 1/2" squares), Fabric C (one 4 1/2" square), Fabric A and Fabric B (one each 7" square)

Step 2: Choose your favorite method to make four 4 1/2" half-square triangles. Remember to trim the half-square triangle sub-units to 4 1/2".

I am following Method 2 for making my half-square triangles. You can find a photo tutorial for two methods of making half-square triangles here in the last post.

Step 3: Arrange your sub-units into rows and columns in the order you will sew them.

I lay mine on a flannel board so I don't mix up my sub-units while I am sewing them. I've picked apart more blocks than I can count! 


Step 4: You can sew the rows and columns together in any way that is easiest for you. The photos are the way I sew this block together because this is the way that is easiest for me. I'm open to other ideas, so if you have an easier way of doing it, I'd love to know it!

I lay the center column of sub-units right sides together over the left column
of sub-units and pin.
Chain sew the blocks together. 
If you need a refresher on chain sewing, look here.


Step 5: Lay the right column of sub-units over the center sub-units and pin in place. Chain sew the new sub-units.

I pin because I often sew a block in the wrong spot or I sew it in the wrong direction.


Step 6: Press the seams of the rows with the half-square triangles towards the center and the center row (the one with only 4 1/" squares) towards the outside.

If you press in these directions your seams will have less bulk and it will be easier to get them to nest together.

 Step 7: Sew the three rows together.
This is the back of my block after it has been sewn together and pressed. I pressed the last two seams towards the center to reduce bulk.
 Just in case you are wondering, I don't clip my threads between the chain sewing unless I have to. Chain sewing and pinning help me to sew things in the correct order and in the correct direction. It is a bit tricky to press with the threads between the sub-units, but I would rather work around the threads than have to pick them out and sew the sub-units again!
All done and squared up!
It should measure 12 1/2".

Too small? 

Watch the video below for help :) Yes, I've done it and it works.