New to Quilting?

If you are brand new to quilting and don't know where to begin, start with the posts in September 2011 (look in the blog archive). The first four posts cover basics such as choosing equipment, choosing colors, how to sew 1/4" seams, how to use a rotary cutter, and how to press (not iron) your block during construction.

Sunday, August 19, 2012

Mistake Star - Quilt Block Tutorial

Mistake Star? You've never heard of it before? That's because I made a mistake in the original pattern and ended up with a different star than I planned!

Crystal and my niece decided that they liked the accidental version and voted that I leave it as is instead of ripping it out and starting again. So the tutorial is for the Mistake Star instead of Hope of Hartford, which is what I was planning.

Hope of Hartford (or in this tutorial: Mistake Star) is a block that is relatively easy. A few skills you will build while sewing this block include:
  • reading 1/8" marks on your ruler 
  • sewing on the bias (a little Magic Sizing helps) 
  • and one partial seam (just follow the photos and it will be easy!)

Since I've never seen this block before I thought I'd name it. I couldn't think of a better than Mistake Star, which is a cousin of Hope of Hartford! However, if you've seen it before, please let me know it's real name and I'll post it!

Mistake Star
12" finished block, 12 1/2" unfinished.

Hope of Hartford (the block I was planning on sewing): directions can be found at Delaware Quilts
Delaware Quilts also has a great Block of the Month photo index if you are interested in finding more of their tutorial but want to see a photo of the block, not just a list of block names, which is usually what you find at other sites.

Before you cut the pieces on the diagonal, press the square of fabric with Magic Sizing to give the fabric more body and help reduce or prevent the bias edge from stretching during sewing.

Cut from background fabric
(A1) four 2 7/8"  x 5 1/4" rectangles
(A2) one 6" x 6" square (cut in half diagonally twice)


Cut from medium fabric (mine is red)
(B1) one 6" x 6" square (cut in half diagonally twice)
(B2) one 2 7/8" square

Cut from dark fabric (mine is green)
(C) two 5 5/8" squares (cut each square in half diagonally once)

I pressed all the pieces with Magic Sizing because I'll be sewing on bias edges on (A2), (B1), and (C). The Magic Sizing gives enough body to the fabric that it is easier to work with and less likely to stretch while I'm sewing it. I buy Magic Sizing at my local grocery store right next to the starch (which I don't use in quilting). Press with Magic Sizing *before* cutting each piece along the diagonal.

(A2) cut in half diagonally twice, (B1) cut in half diagonally twice, and two (C) cut in half diagonally once.
Ready to sew!

Here's where my mistake started! I lined everything up just right for Hope of Hartford, but I when I placed the pieces right sides together I forgot to pin the edge that I was sewing......
.... and sewed the wrong edge! After I sewed the first seam the sub-units looked like this. I just kept going because I hadn't noticed something was wrong, yet! Follow *this photo* to line up your triangles, pin along the edge you should sew, then sew and press towards the dark side. Make sure all four sub-units turn out the same!
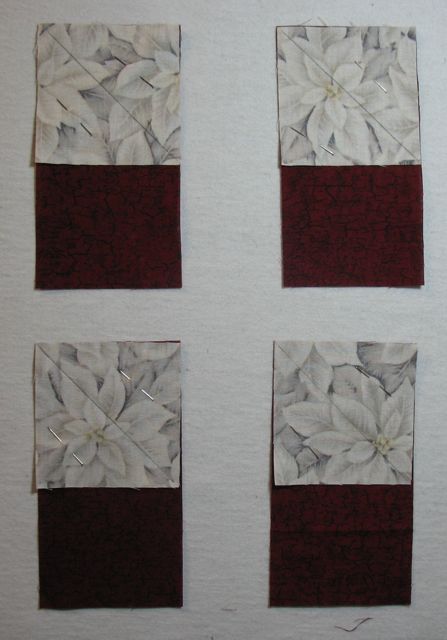
Lay (C) on top of (A2+B1) sub-unit and sew along the long edge of the triangle. Be careful, this is a bias edge and if you stretch it while you are sewing, your block won't turn out well. The top two units have (C) laid over the top, the bottom two show what the first triangle sub-units look like underneath.
Sew each (C) to a (A2+B1) sub-unit, press open with the seam towards (C).

Pin and sew one (A1) piece to each triangle sub-unit as shown in the photo.

Press towards the rectangle (A1) to reduce bulk.
Here's where we sew a partial seam. Don't worry, it isn't hard, just different.

Pin (B2) to one unit as shown. (The rectangle piece (A1) is at the bottom.) Match the center (B2) to the red (B1) corner. Sew along the yellow dotted line leaving about 1" of the square unsewn.
During each step you will be lining up the red triangle (B1) with the red center square (B2).

You can see the white seam and how much is left unsewn. Yep! I started off at the top a little wonky. I fixed it after I took the photo.
You can finger press the seam open, but don't press it with the iron yet.

Next, lay the piece that you just sewed on top of another unit with the reds (fabric B) matching in the corner. The pink dotted line shows the first partial seam sewn. Pin and sew along the yellow arrow.

Finger press open. The arrow is pointing to the partial seam.

Lay another unit on top of the part of the block that is already sewn. In the photo above, I left the orientation of the block from the previous photo and laid another unit on top with the (A1) rectangle to the left. Pin and sew along the yellow arrow.

Finger press open. The blue arrow shows the last seam sewn, the yellow arrow shows the partial seam that is still open.
Lay the final piece on top of the previously sewn block. Sew along the yellow line. It's usually easier to flip the block over and sew as shown in the next photo.

If you sew from this side you can lift the block away from the partial seam so you don't accidentally sew it.
This is what your block should look like now. You should have one seam left that will include the partial seam on the center square (B2). This is the last seam you will sew in the block.
Place right sides together, matching the unsewn edges of the block. The blue arrow shows the partial seam that was sewn first. The yellow arrow shows where you will sew the final seam to finish the block.

Press the block with a hot iron. Here's a photo of the finished block: Mistake Star.
If you have any questions, *please* leave me a comment. This block is probably easier to show in a video than step-by-step photos and I'm not sure if my directions are clear enough.

If they aren't, chances are you aren't the only one that's confused!

Sharing this post at Not Just a Housewife

Update: 8 February 2015
I just read a post on Barbara Brackman's block that has this same block. The link will give you the history of the block and a little more about it.

It's name was published as "Hope of Hartford" by the Farm Journal in 1945.

Tuesday, August 14, 2012

Windblown Square - Quilt Block Tutorial

This block is called 'Windblown Square'. It's fairly easy, but has one new technique (sort of) for you.

Windblown Square
If you sewed the Tree Block you can sew the parallelogram unit! If you did any of the blocks with Flying Geese units in them, you can complete the Windblown Square. (Flying Geese Method 1, Flying Geese Method 2).

You can also make this block using only Half-square triangles! My niece, who was learning how to quilt, wanted to try something new so we chose to use Flying Geese units and parallelogram units.

I'll be using Flying Geese Method 2 to make my Flying Geese Units. If you choose another method, please be sure to adjust your fabric cutting!

Cut from background fabric
(A1) eight 3 1/2" x 3 1/2" squares
(A2) one 9" x 9" square

Cut from fabric 1 (green)
(B) one 7 1/2" square

Cut from fabric 2 (red)
(C) four 3 1/2" x 6 1/2" rectangles


From background fabric (A) cut eight 3 1/2" x 3 1/2" squares. From fabric 1 (B) cut one 7 1/2" squares. From fabric 2 (C) cut four 3 1/2" x 6 1/2" rectangles.
Draw a diagonal line on (A1) squares and (B) square.

Pin the (A1) squares to one end of the (C) rectangles with the diagonal line going from top left to bottom right. Pin in place.

Sew just to the right of the diagonal line.

Line any ruler that has a 1/4" seam marking with the 1/4" marking ON the diagonal line. In this photo the dotted line is the 1/4" seam line and it is on the diagonal line.

Trim the corner off and either throw it away or save it for a future project.

The top two units are pressed open towards the light fabric. The bottom two units have the next (A1) squares in place with the diagonal lines parallel to the first seam (the diagonal line is laid out from top left to bottom right).

Sew the second diagonal line the same way you sewed the first diagonal line.

Again, line up a ruler with the 1/4" seam line on the diagonal line......

and trim off the extra fabric triangle.

Press open. I pressed this seam towards the red fabric because later on it makes one seam less bulky.
One seam pressed towards light, one seam pressed towards dark. However, you can press them both towards the light or dark. This block will have a few bulky seams no matter how you press it. This unit should measure 6 1/2" x 3 1/2" unfinished.

Using (A2) and (B) fabrics make four Flying Geese units. I used Method 2, but you can use whatever method you are most comfortable with. Each Flying Geese unit should measure 6 1/2" x 3 1/2" unfinished.

Sew one Flying Geese unit to one parallelogram unit as shown. The seams on the Flying Geese units are pressed towards the light. Match the seam on the parallelogram unit that is pressed towards the red with the point on the Flying Geese unit.

Press towards the Flying Geese unit (or which ever way gives you the least bulk and the nicer point).

Sew all four units and lay them out as shown.

Sew into rows.....
Then sew the two rows together to form your block.

One the back you will probably be able to open the seams in the center of the square. This reduces bulk in the seam. It isn't a 'must do', it just makes the block lay flatter when you are trimming it and later putting it into a quilt.

The finished block!

And here is my niece! She helped me sew this block (and pick the colors!) While she was visiting she made quite a few beautiful blocks. This is her first experience with quilting and I think she really enjoyed it!

Friday, April 20, 2012

Tree - Quilt Block Tutorial

I haven't done a tutorial on Lynne's House block yet because I'm trying to figure out a way to make it easier to cut out, as well as making it easier to sew the bias seams, so watch for it next month or so.

This Pine Tree block is very easy. It's not one of the Block of the Month blocks that we are doing as a group. It's one of the extra blocks I am adding into my quilt since I like having more than nine blocks in my quilt.

Pine Tree block (or Christmas Tree block if you use Christmas fabric like I did)

This block has a few more pieces to cut that are different sizes than we have cut out before. It's isn't hard because almost all the pieces are 2 1/2" in one dimension, which makes a perfect first block with lots of pieces.

The only technique we will be using is sewing along a diagonal line drawn on a square. If you made the Eight Pointed Star, you did the same technique in the first step.

Cut from background fabric
It makes it much easier to cut out a long strip of fabric that is 2 1/2" wide and then cut the lengths you need from the strip (or strips).

(A1) ten 2 1/2" x 2 1/2" squares (woops! I miscounted and cut out 12 in the photo below)
(A2) two 2 1/2" x 1 1/2" rectangles
(A3) two 2 1/2" x 3 1/2" rectangles
(A4) two 2 1/2" x 4 1/2" rectangles
(A5) two 2 1/2" x 5 1/2" rectangles
(A6) two 1 1/2" x 12 1/2" strips

Cut from main fabric (green)
You can cut all the strips from the same color, or for a more scrappy look you can cut the tree strips from different scraps of green. If you are using the same color, it is easiest to cut out a strip of fabric 2 1/2" wide x 30" long.

(B1) one 2 1/2" x 4 1/2" rectangle
(B2) one 2 1/2" x 6 1/2" rectangle
(B3) one 2 1/2" x 8 1/2" rectangle
(B4) one 2 1/2" x 10 1/2" rectangle

Cut from brown (trunk of tree)
(C) one 2 1/2" x 2 1/2" square

The two strips at the bottom of the photo SHOULD read "two 12 1/2" x 1 1/2") Sorry for the mistake!


Making the Tree Points
Draw a diagonal line from corner to corner on eight 2 1/2" x 2 1/2" squares (A1)

Pin each A1 square onto a green strip (B1, B2, B3, B4) with the top of the diagonal line pointing towards the center of the strip, and the bottom of the diagonal line matching the corner of the green tree strips.

 I pin so the point of the pin is facing my sewing needle. I get poked less and I can pull the pin out easily. The top of the tree has only one square pinned on. You must sew on one A1 square, trim the corner (see photos below), press, then position and sew the second A1 square. All green pieces can have an A1 square pinned on both ends and sewn one right after the other.


Line the needle up just to the right of the pencil line. Your machine may be different, but when I sew just a tad to the right of the line (towards the corner that will be cut off) I don't loose any fabric to the seam when I press. In other words, I have a more accurate block when I'm done.

Cut 1/2" from the seam on all A1 pieces. In the photo, I've moved the ruler down just a little so you can see that it is 1/4" from the seam.

This is what the strip looks like when the corners are trimmed off. On the top piece of the tree you must sew on one square, trim, then press before you sew the second square on.

Pin the other A1 background square on as shown in the photo. Sew, trim, and press. This tree top is a Flying Geese unit.

All the "B" pieces have an A1 square sewn, trimmed, and pressed (towards the light fabric). The bottom strip shows the brown trunk piece (piece "C") ready to be sewn to the 5 1/2" (A5) piece. I usually sew all three of the pieces together before I press.

Make sure your trunk section measures 12 1/2" long.
In this photo you can see how each background filler strip is placed.

You can sew the outside filler strips (the background pieces) on in any order that makes you happy! Yes, I pin at the top and the bottom of each 2 1/2" strip because my sewing is more accurate that way, and that makes me happy!

I pressed towards the background fabric because that makes the least bulk in the seam. I also checked to see if each row was 12 1/2". One was a little long, so I trimmed an equal amount of fabric from each side. The center of each row is at the 6 1/4" mark so if you have to trim, too, you know where to put the center of your ruler.


Sew the rows together and your tree block is done!

If you've got any questions, please ask them below and I'll try to explain my steps better.