Welcome to our Neighborhood Quilt Club! Don't worry about how much experience you've had quilting. We're happy to hold your hand while you learn. Feel free to post questions in the comments below the posts. Also feel free to send us a photo of your block for us to post! We would all love to be inspired by your color choices!
New to Quilting?
If you are brand new to quilting and don't know where to begin, start with the posts in September 2011 (look in the blog archive). The first four posts cover basics such as choosing equipment, choosing colors, how to sew 1/4" seams, how to use a rotary cutter, and how to press (not iron) your block during construction.
Wednesday, January 4, 2012
Flying Geese: Method 2 (Tutorial)
Here's what we are sewing in this post:
Method 2 for sewing Flying Geese units was developed by Eleanor Burns at Quilt in a Day. You can use this method whether or not you have a Flying Geese ruler. They come in different sizes and they have great directions included. If you have a Flying Geese ruler, we are following the directions for the 6" x 3" Flying Geese. If you don't have a special ruler, a 6 1/2" square ruler works, too.
This is not a 'no waste' method. You will be throwing away a tiny bit of fabric at the end. I use this method because I get more accurate Flying Geese units. There is a little bit of 'error' room built into the method which means I can trim away the extra and end up with exact measurements.
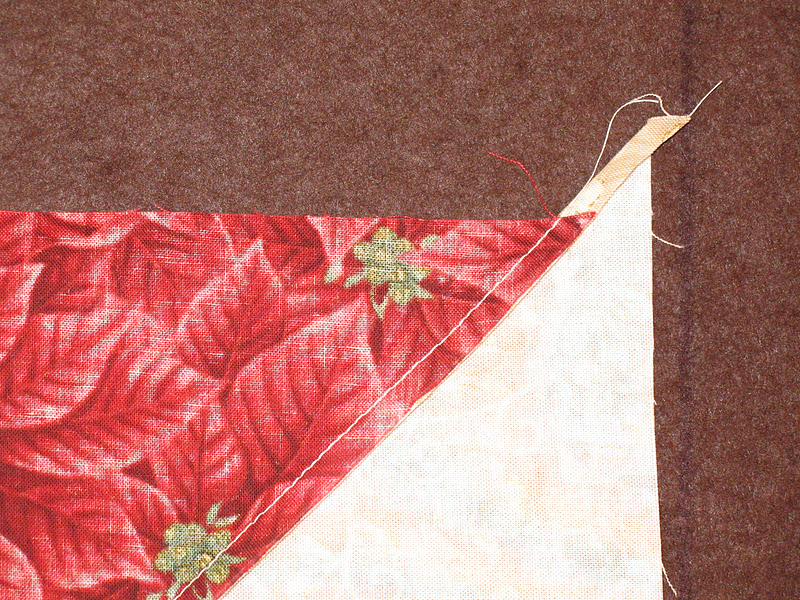
Cut one 9" square from background fabric. Cut one 7 1/2" square from main fabric (this will be the 'goose' part of the block). Draw a diagonal line from corner to corner on the right side of the background fabric, and the wrong side of the main fabric (geese fabric).
Center the 7 1/2" square right sides together with the 9" background fabric
Match the diagonal lines.
Sew a 1/4" seam on either side of the diagonal line on the main fabric (geese fabric). You don't have to sew to the edges of the background fabric.
Cut along the diagonal line.
Press towards the background fabric. It's a little odd to press that direction, but do it anyway. It makes the rest of the block easier to put together and press.
You now have two pieces that look like this!
Turn one piece 180˚ and then place the two pieces right sides together matching the corners, not the center seams.
This is a photo of the pieces right sides together with the corner folded back so you can see that the bottom piece has been turned 180˚ and the seams don't match up.
Draw a diagonal line as shown in the photo. It goes from corner to corner across the seam. Pin the two pieces together.
Sew a 1/4" seam on both sides of the center line, then cut on the line.
Here is where it gets a bit odd, but just follow along and trust me. It works out really well!
Clip the seam allowance at the center of the seam of both pieces.
This is how I find the center of the seam allowance: Fold one of the pieces in half (it doesn't have to be exactly in half, 'close enough' is good for this method). The red arrow shows where I will clip the seam, the black arrows show where the first seams are.
You have to clip the seam allowance so that when you press the block, the seam can be pressed to the background fabric.
Press towards the background fabric. This is what it looks like after the piece has been pressed. See the clipped seam allowance in the center?
Both pieces clipped and pressed towards the background fabric. The top left piece is a right-side view. The bottom right piece is a wrong-side view. If you click on the photo it will enlarge and you can get a closer look.
Cutting the four Flying Geese units.
Center the 3 1/4" mark of your ruler on the top of the triangle 1/4" away from the edge of the ruler. The blue arrow shows the spot.
Photo of the ruler on the whole block.
Cut along three sides of the ruler. Then flip the fabric piece and line up the bottom of the fabric with the 3 1/2" line on the ruler and trim. You will end up with a 6 1/2" x 3 1/2" Flying Geese unit. Trim the other pieces the same way.
If you have a Flying Geese ruler.....
If you own a 6" x 3" Flying Geese ruler, line the green triangle up with your center triangle (geese fabric) and trim around all four sides. Do that for each piece and you will have four Flying Geese units.
This is my favorite way to make Flying Geese units.
Please give me a call if you want to borrow my Flying Geese ruler! I'm happy to let you give it a try.
I've been spammed like crazy lately! Please take an extra few seconds for the word verification if you are a real person and would like to comment. So sorry for the inconvenience.


I lost my flying geese ruler instructions - thanks for posting this tutorial!
ReplyDeleteYou're welcome!
ReplyDeleteAwesome
ReplyDelete