New to Quilting?

If you are brand new to quilting and don't know where to begin, start with the posts in September 2011 (look in the blog archive). The first four posts cover basics such as choosing equipment, choosing colors, how to sew 1/4" seams, how to use a rotary cutter, and how to press (not iron) your block during construction.

Wednesday, January 4, 2012

Dutchman's Puzzle - Quilt Block Tutorial


Dutchman's Puzzle

Page 1 of Liz's directions.

Page 2 of Liz's directions.

If you have tried either Method 1 or Method 2 for sewing Flying Geese units you should already have at least four units done. If you tried both methods, then you have eight units, which is what you need for Dutchman's Puzzle. One of the other names for this block is Flying Dutchman, so if you want to do a Google search and find finished quilts using the block you can use either name.

I used Flying Geese in two colors, green and red. You can choose to do all the Flying Geese the same color or all different colored Flying Geese.

Here are the two layouts I looked at with my finished Flying Geese units.

Green Flying Geese in the center or......

Red Flying Geese in the center?
I'm choosing red Flying Geese in the center.

You can probably already see how easy the rest of this block is to put together, you've already done the difficult part, making the Flying Geese units.

I'll show you the sewing steps just in case you want to see the baby steps. I needed to see them when I was first quilting!

Sew the Flying Geese units into pairs of Flying Geese units.
I stacked all my green Flying Geese units on top of each other, and did the same with the red Flying Geese units. Chain sew each green Flying Geese unit to a red Flying Geese unit.
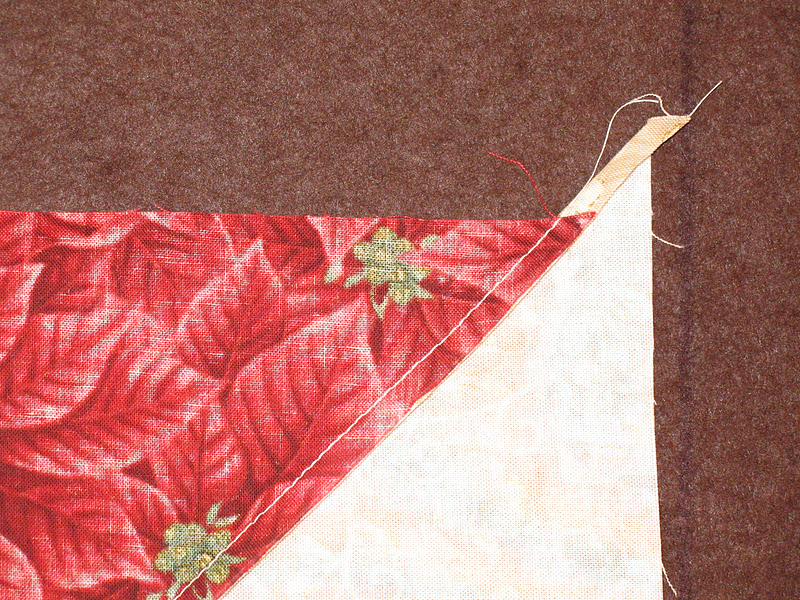
Press the seam towards the top unit so there is less seam bulk.
The yellow arrow shows how the new seam should look, it should cross the seam in the 'goose' part of the unit so that you will have a really nice point in your finished block.
How Important is it to Trim Your Units?
One of the reasons to trim your units before you sew them into a block is to make sure you have 1/4" seam allowances for the next step, especially on triangle shaped pieces! The goal is to have your finished block have nice points instead of chopped points. Both posts on sewing Flying Geese units show you how to trim your Flying Geese units so that the point is 1/4" from the edge of the block.

I always (always!) measure and trim my units (if necessary) before I put the units into a block. If the units are too big (or too small) or they aren't all the same size, your finished block won't sew together properly. Take the time to measure and trim each piece, it save you the time of having to pick out seams later.

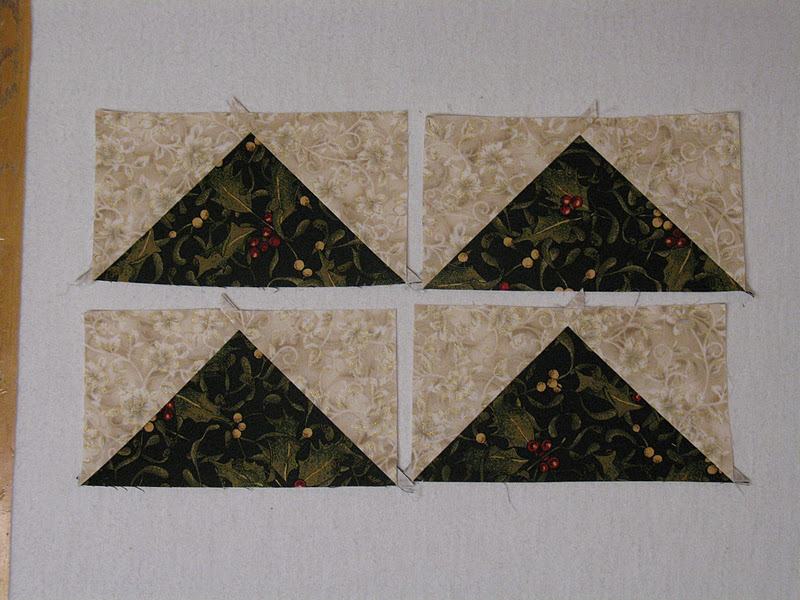
Pairs of Flying Geese units sewn together and pressed. You should have four units now.
The units from the right side in the previous photo have been placed right sides together on the units from the left side of the previous photo and pinned. If I don't pin them, I am will sew the wrong edge and have to pick it out.
Sew the pinned edges. You will have two units (instead of the eight you started with). One more seam and your block will be finished (except for trimming the block to 12 1/2").

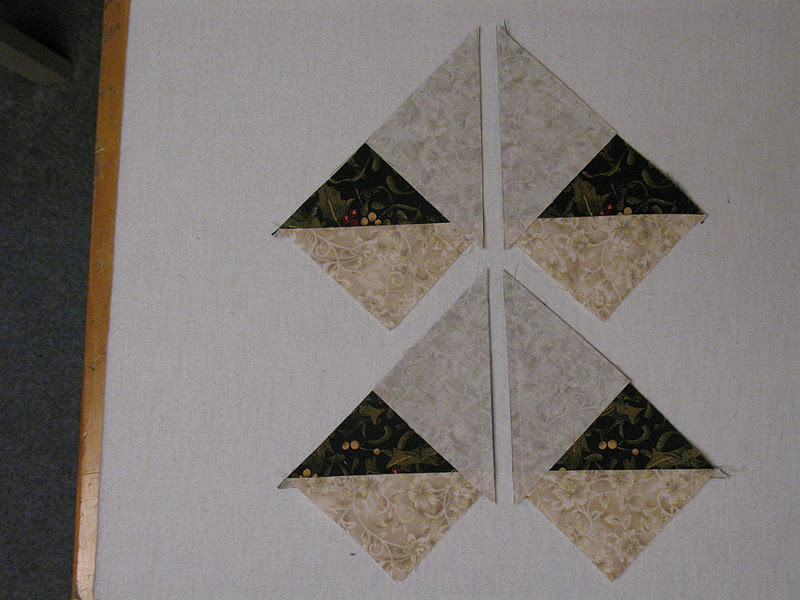
Press your seams in opposite directions, in the photo above the seams are pressed towards the red triangles.
Seams pressed in opposite directions so they will nest as you sew the next seam. Nesting seams make less bulk and help points come together nicely.

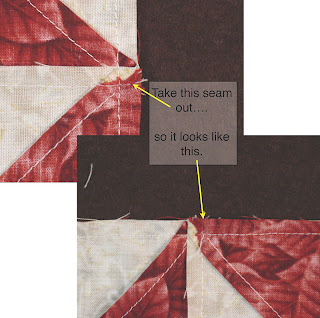
Before you press your block open, take out the seam that is in the seam allowance area at the center of the block.
Then open your block up and spread open the center of the block where all the seams come together.

It will make a little pinwheel. Doing that will let all the seams in the block lay clockwise (or counter-clockwise if you've sewn seams opposite of mine) and reduce the bulk in the center of your block.
If you don't want to spread the seams and would rather press your last seam to one side, that works, too. When I do that I end up with a little tent in the middle of my block and I have a hard time getting it to lay flat.

Finished block! If you enlarge it you can see that all my points ended up very 'pointy' except for one in the very center.
It's taken me years to slow down enough and do all the little in-between steps of measuring and trimming to get most of my points to look like that. If yours turned out nice on the first try, congratulations! You must be a natural born quilter or very detail oriented!

End Note:
I brought my camera to Quilt Group last night with the intention to take photos of all the blocks you ladies are sewing. The color choices are wonderful and you are all making beautiful blocks! You should be proud of yourselves!

But I forgot to put the SD card into the camera before I left.

So if you have photos of your finished blocks, please send them to me so I can post them.

And if I haven't explained something clearly enough, please send me an email or leave a comment and I'll try to do a better job explaining.

How To Sharpen a Rotary Cutter (Cheaply!)

I found this idea in a few places on the internet and thought I would give it a try.

I was surprised at how well it worked!

I experimented on a really old rotary cutter and blade. I've been using the blade to trim paper for 2 or 3 (or more) years. It works fine for paper....

but definitely doesn't work well on fabric.

If you look closely you can see that it didn't cut the fabric very well. I should have used a different color (duh!), but you can see in the photo that there were a few places that the cutter didn't cut the threads.

I folded up some aluminum foil. I think there are 8 layers in the photo. I don't think it matters too much how many layers there are, but more than one layer would probably be best.
I sliced through the aluminum foil quite a few times (see the pile!) I wanted to make sure that I rolled the entire blade through the foil at least 8 times. I don't know why I picked that number, I just thought that more than once would do a better job sharpening the blade.
I used the newly sharpened rotary cutter to make a new cut to the left of the old cut.
It sliced right through the fabric!

 It wasn't quite as good as a brand new blade, but it was much better than the first cut I tried to make!

I think I'll try sharpening an old pair of scissors next. I have a pair that don't cut through plastic bags any more, so even if the aluminum foil trick doesn't work, it can't make them any worse than they already are.

Flying Geese: Method 2 (Tutorial)

Here's what we are sewing in this post:


Method 2 for sewing Flying Geese units was developed by Eleanor Burns at Quilt in a Day. You can use this method whether or not you have a Flying Geese ruler. They come in different sizes and they have great directions included. If you have a Flying Geese ruler, we are following the directions for the 6" x 3" Flying Geese. If you don't have a special ruler, a 6 1/2" square ruler works, too.


This is not a 'no waste' method. You will be throwing away a tiny bit of fabric at the end. I use this method because I get more accurate Flying Geese units. There is a little bit of 'error' room built into the method which means I can trim away the extra and end up with exact measurements.

Cut one 9" square from background fabric. Cut one 7 1/2" square from main fabric (this will be the 'goose' part of the block). Draw a diagonal line from corner to corner on the right side of the background fabric, and the wrong side of the main fabric (geese fabric).
Center the 7 1/2" square right sides together with the 9" background fabric

Match the diagonal lines.


Sew a 1/4" seam on either side of the diagonal line on the main fabric (geese fabric). You don't have to sew to the edges of the background fabric.

Cut along the diagonal line.

Press towards the background fabric. It's a little odd to press that direction, but do it anyway. It makes the rest of the block easier to put together and press.

You now have two pieces that look like this!

Turn one piece 180˚ and then place the two pieces right sides together matching the corners, not the center seams.

This is a photo of the pieces right sides together with the corner folded back so you can see that the bottom piece has been turned 180˚ and the seams don't match up.


Draw a diagonal line as shown in the photo. It goes from corner to corner across the seam. Pin the two pieces together.

Sew a 1/4" seam on both sides of the center line, then cut on the line.
 Here is where it gets a bit odd, but just follow along and trust me. It works out really well!

Clip the seam allowance at the center of the seam of both pieces.


This is how I find the center of the seam allowance: Fold one of the pieces in half (it doesn't have to be exactly in half, 'close enough' is good for this method). The red arrow shows where I will clip the seam, the black arrows show where the first seams are.
 You have to clip the seam allowance so that when you press the block, the seam can be pressed to the background fabric.
Press towards the background fabric. This is what it looks like after the piece has been pressed. See the clipped seam allowance in the center?

Both pieces clipped and pressed towards the background fabric. The top left piece is a right-side view. The bottom right piece is a wrong-side view. If you click on the photo it will enlarge and you can get a closer look.
 Cutting the four Flying Geese units.
Center the 3 1/4" mark of your ruler on the top of the triangle 1/4" away from the edge of the ruler. The blue arrow shows the spot.
Photo of the ruler on the whole block.
 Cut along three sides of the ruler. Then flip the fabric piece and line up the bottom of the fabric with the 3 1/2" line on the ruler and trim. You will end up with a 6 1/2" x 3 1/2" Flying Geese unit. Trim the other pieces the same way.

If you have a Flying Geese ruler.....
If you own a 6" x 3" Flying Geese ruler, line the green triangle up with your center triangle (geese fabric) and trim around all four sides. Do that for each piece and you will have four Flying Geese units.
 

This is my favorite way to make Flying Geese units.

Please give me a call if you want to borrow my Flying Geese ruler! I'm happy to let you give it a try.

Here's a link to a PDF file that has another method for making Flying Geese units called  One Seam Flying Geese Method.

Here's a video that shows you how to sew the One Seam Flying Geese method:

Flying Geese: Method 1 (Tutorial)

This is the method that Liz will be teaching for the January Block, Dutchman's Puzzle.

Here is what we will be sewing today:

If you click on this link from Patchpieces (No Waste Method for Making Flying Geese Units) you will open a PDF with great step-by-step instructions including how to make the Flying Geese units in any size. You can also find the instructions here on the left side of the page.

The tutorial will make four Flying Geese units that are 3" x 6" finished ( 3 1/2" x 61/2" unifinished).

Cut one 7 1/4" square (this is your 'goose' or center triangle)
and four 4" squares (background fabric)

Draw a line diagonally on the wrong side of the background fabric.

Place two background squares on opposite corners of the 7" square (goose), matching the corners and the diagonal lines. Pin the square in place so they don't shift while you are sewing. I usually put two pins in each background square.

Sew a scant 1/4" seam on either side of the pencil line across both background squares.

Cut along the drawn line.

Press open towards the small (background) squares (which are triangles after cutting). The bottom unit in the photo shows how it looks from the right side, the top unit in the photo shows what it looks like from the back with the seam pressed towards the background fabric.

Place the other two background squares on the pressed blocks. Match the corner of the background square with the corner of the dark (goose) square with the diagonal line going from the corner through the "V" made by the sewn background squares. (Just see the photo! It's probably more clear than me explaining it!) Pin in place.

Sew a scant 1/4" seam on both sides of the drawn diagonal line. If everything is perfect, then your stitching line will come out of the little "V" between the background squares.
If you look closely you can see the white stitching 1/4" on both sides of the pencil line. The stitching ends close to the "V" formed by the two pieces of background fabrics. (see the arrows). No, mine isn't perfect!

Cut along the drawn line on both units.

Press open. Voila! Four Flying Geese units ready to trim!
Notice where the red arrow is pointing. For this a 3 1/2" x 6 1/2" Flying Geese unit place the center point is on the 3 1/4" mark on your ruler. The 3 1/4" point should also be 1/4" away from the edge of the ruler so that when you trim you have a 1/4" seam allowance.

This is how the ruler and the Flying Geese unit looks before trimming. I have a 6 1/2" ruler so I can trim the three sides that are showing. Next flip the Flying Geese unit 180˚. Line the previously cut edge up on the 3 1/2" line and trim the remaining side.

Four Flying Geese units ready to sew into your block.
The Flying Dutchman block uses eight Flying Geese units. In the next post I'll use Method 2 (the Quilt in a Day method) for making Flying Geese.