 |
| Dutchman's Puzzle |
 |
| Page 1 of Liz's directions. |
 |
| Page 2 of Liz's directions. |
If you have tried either Method 1 or Method 2 for sewing Flying Geese units you should already have at least four units done. If you tried both methods, then you have eight units, which is what you need for Dutchman's Puzzle. One of the other names for this block is Flying Dutchman, so if you want to do a Google search and find finished quilts using the block you can use either name.
I used Flying Geese in two colors, green and red. You can choose to do all the Flying Geese the same color or all different colored Flying Geese.
Here are the two layouts I looked at with my finished Flying Geese units.
 |
| Green Flying Geese in the center or...... |
 |
| Red Flying Geese in the center? |
You can probably already see how easy the rest of this block is to put together, you've already done the difficult part, making the Flying Geese units.
I'll show you the sewing steps just in case you want to see the baby steps. I needed to see them when I was first quilting!
Sew the Flying Geese units into pairs of Flying Geese units.
 |
| I stacked all my green Flying Geese units on top of each other, and did the same with the red Flying Geese units. Chain sew each green Flying Geese unit to a red Flying Geese unit. |
 |
| Press the seam towards the top unit so there is less seam bulk. |
 |
| The yellow arrow shows how the new seam should look, it should cross the seam in the 'goose' part of the unit so that you will have a really nice point in your finished block. |
One of the reasons to trim your units before you sew them into a block is to make sure you have 1/4" seam allowances for the next step, especially on triangle shaped pieces! The goal is to have your finished block have nice points instead of chopped points. Both posts on sewing Flying Geese units show you how to trim your Flying Geese units so that the point is 1/4" from the edge of the block.
I always (always!) measure and trim my units (if necessary) before I put the units into a block. If the units are too big (or too small) or they aren't all the same size, your finished block won't sew together properly. Take the time to measure and trim each piece, it save you the time of having to pick out seams later.
 |
| Pairs of Flying Geese units sewn together and pressed. You should have four units now. |
 |
| Press your seams in opposite directions, in the photo above the seams are pressed towards the red triangles. |
 |
| Seams pressed in opposite directions so they will nest as you sew the next seam. Nesting seams make less bulk and help points come together nicely. |
 |
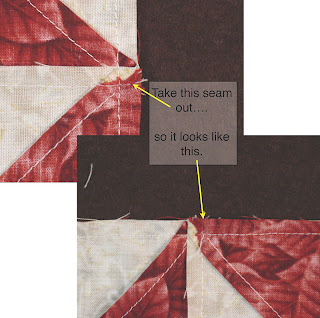
| Before you press your block open, take out the seam that is in the seam allowance area at the center of the block. |
 |
| Finished block! If you enlarge it you can see that all my points ended up very 'pointy' except for one in the very center. |
End Note:
I brought my camera to Quilt Group last night with the intention to take photos of all the blocks you ladies are sewing. The color choices are wonderful and you are all making beautiful blocks! You should be proud of yourselves!
But I forgot to put the SD card into the camera before I left.
So if you have photos of your finished blocks, please send them to me so I can post them.
And if I haven't explained something clearly enough, please send me an email or leave a comment and I'll try to do a better job explaining.


No comments:
Post a Comment
I've been spammed like crazy lately! Please take an extra few seconds for the word verification if you are a real person and would like to comment. So sorry for the inconvenience.