New to Quilting?

If you are brand new to quilting and don't know where to begin, start with the posts in September 2011 (look in the blog archive). The first four posts cover basics such as choosing equipment, choosing colors, how to sew 1/4" seams, how to use a rotary cutter, and how to press (not iron) your block during construction.

Monday, February 20, 2012

Eight Pointed Star - Quilt Block Tutorial

I usually have 12 or more blocks in a quilt. Since our Block of the Month Group is only planning on 9 blocks, I decided to add a few of my own blocks.

Eight Pointed Star
I first learned this technique at Quilt, Etc. I choose this method if I have a large print for my star. I don't want to break up the large print with a seam through the middle of one of the points. Another method of making this star uses half-square triangles (leave a comment if you would like a tutorial on that method).

This is not a 'no waste' method of making stars. This is a very accurate method, but there is alot of waste. I get creative and use the extra pieces on the back of the quilt or in the border.

In order for this pattern to work you also have to have a small print or a solid for the background fabric. If you have a busy background print you will see the seams more clearly.

As always, the seams are a scant 1/4".

Cut from background fabric
(A1) eight 4" x 6 1/2" rectangles
(A2) eight 3" squares

Cut from color 1 (red)
(B) four 3 x 6 1/2" rectangles

Cut from color 2 (green)
(C) four 3 x 6 1/2" rectangles

Everything cut out.

Draw a diagonal line on the wrong side of each square background (A2)

Place a background square (A2) right sides together on each 3 x 6 1/2" rectangles (B, C).   

Make sure the diagonals slant towards the right on one fabric and to the left on the other fabric. In my photo the squares (A2) slant towards the right on my red (B) fabric and to the left on my green (C) fabric. Pin so the square doesn't shift while you are sewing.

Sew along the diagonal line on each square. I usually chain sew all eight sub-units,
one piece after another.

Trim 1/4" to the right of the sewn line on all eight pieces. 
Ready to cut. It's hard to see, but the two corners of the square and the drawn line are under the 1/4" line of the ruler.

This is what your sub-unit will look like when it's trimmed.
Press one color towards the background fabric (A) and one color towards the colored fabric (B or C).
 Eleanor Burns is always very careful about pressing. Reading her books and watching her videos has taught me to think through the pressing process so that I have the least amount of bulk in the seam allowances. It also allows seam nesting, which makes for better points.

I pressed my AB sub-units towards the background (A) and my AC sub-units towards the green (B) fabric.

Using your AB and AC sub-units place an A1 unit (4 x 6 1/2" background) fabric on the LONG edge of the colored fabric. See the photo above.

Sneak peak! I pushed the unsewn pieces from the above photo together and placed paper over the parts that will be trimmed away just to see if I had everything lined up correctly. 
Sew the AB and AC sub-units to the 4"x 6 1/2" rectangle.

Press the seam towards the red (B) fabric, and towards the background (A) fabric on the units with green (C) fabric.

Make sure your seams nest, then place one AC unit on top of an AB unit matching the colored fabrics. (See top left in the photo). Draw a diagonal line that is parallel with the first seam (see photo). Nest seams and pin in place along the drawn line. 

Sew along the drawn line. 
You can't see the stitching, but this unit is ready to be trimmed 1/4" from the sewn edge.
Check and double check to make sure you are cutting on the correct side of the line. You should only have a small colored triangle on the right side of the ruler and MOST of the colored fabric under the ruler. 
This is what you want it to look like after it's been cut. 
Press towards one side. It isn't as important to press towards one side or the other in this step. I generally press towards the green (C) fabric.

Get your blocks ready to sew the next seam. It's really starting to look like a star now!

Place one unit right sides together with another, nest the seams and pin where the seams nest to keep them from shifting while you sew.

I place my sewn units like this on the pressing board so that I remember to press one seam up and one seam down. This press is important because it will allow you to nest the center seam of the star.
Place both halves of the block together and nest the seams, especially the seams at the center of the star, pin in place and sew the last seam.

I press on the wrong side so I can swirl the center seam and reduce the bulk. Then I turn it over and do a final pressing on the front.

Final block from the right side.
I love stars! They are also one of my most challenging blocks because I am always trying to avoid cutting off the points. If my cutting and seams aren't accurate--I loose points every time. 

As always, you are welcome to leave a question in the comments if I haven't explained something clearly enough.

Sunday, February 5, 2012

Wheel of Chance - Quilt Block Tutorial (method 1)


Ammie's Wheel of Chance

 This is Ammie's version of Wheel of Chance. (If you are looking for another way to sew this block, look here for method 2)

Read through all the directions before you start. If you have a different way of making half-square triangles your fabric cuts will be different than the ones listed below. You can find other ways to make half-square triangles here and here.

Cut from background fabric
Eight 3 3/8" x 3 3/8" squares

Cut from main fabric
Eight 3 3/8" x 3 3/8" squares
Eight 2 1/2" x 5 1/2" rectangles

Cut from contrast fabric
(or background fabric)
Eight 2 1/2" x 2 1/2" square


Here is Ammie's layout for cutting.
Best way to cut the fabric

Lay fabric right sides together and cut one strip 3 3/8" x 22", and one strip 5" x 22"
Cut the 3 3/8" x 22" strip into 6 squares. You should end up with 6 background colored squares and 6 main print squares because the original cut you made went through two pieces of fabric.
From the the 4" x 22" strip cut 2 more 3 3/8" squares (you'll have to trim one side because you started with a 4" strip).

You now should have (8) 3 3/8" squares of each color. Set them aside while you finish cutting the rest of the pieces.

Ammie chose the main fabric for her cross in the middle of the block, you can choose either the dark or the light because you have a 4" strips of both.

Cutting the 'cross' in the middle using main print
From the main print, cut (2) 5" x 5 1/2" rectangles.
Slice those in half so you have (4) 2 1/2" x 5 1/2" rectangles.

Cutting the center square
The center square is cut 2 1/2" x 2 1/2" from either the background fabric or a contrasting fabric. (Ammie's chosen a contrasting fabric for hers).

This is what you should have all cut out.
Making the half-square triangle sub-units
 You can use whatever method of making half-square triangles you are comfortable with. You might have to change how you cut out the fabric if you choose a different method than the one Ammie chose. You can look here and here for other ways to make half-square triangles.

Mark a diagonal line through the center of each background 3 3/8" square.
Place background and main fabric squares right sides together.

Sew a scant 1/4" seam on both sides of the drawn line.

Cut on line.

Press open. Press half the blocks towards the main fabric and half the blocks towards the background fabric. This will make it much easier as you sew the half-square triangles together because your seams will nest.
If you pressed half your seam allowances towards the background fabric, and half towards the main fabric, lay out your half-square triangles with the seams facing the direction of the arrows. This will make the seams nest as you sew them together.
 Sew the top two triangles together first to form a flying geese unit. Then sew the bottom two triangles together to form a diagonal strip unit.

Press them with seams going in opposite directions so they nest.

Sew the two units together to form a square. It should measure 5 1/2" square.

Lay your block units out and place them in the correct orientation.
Sew your rows together into three strips. Press towards your main fabric (or the 2 1/2" strips if you chose a different color.)
Sew your rows together and press your finished block.

Ammie says to give yourself a pat on the back because you finished your block!
 Thanks for coming to help us Ammie!

As always, if you have any questions feel free to either leave a comment or email and we'll do our best to answer.

Friday, February 3, 2012

Wheel of Chance - Quilt Block Tutorial (Method 2)

Our block this month is called Wheel of Chance. Ammie did a great job with her photo tutorial, which will be up next post (Last post shows up first on blogs!)

If you want to practice your half-square triangles, use Ammie's version of the block. If you want to practice your flying geese blocks and learn a 'sew, trim, and flip' skill, then follow the tutorial below.

Either version will give you the same block pattern! Some people are more comfortable sewing half-square triangles, and some people like flying geese.

Wheel of Chance
(method 2)


If you are already a great quilter, the tutorial might seem to have too many baby steps, sorry about that. I try to write them so Crystal, who has very little quilting experience, can sew the block on her own from just the explanation on this blog.

Cut from background fabric:
Eight 3"x3" squares
One 8" square

Cut from main fabric
Four 3" x 5 1/2"" strips
Four 2 1/2 x 5 1/2" strips
Four 6 1/2" x 6 1/2" square

Cut from contrast fabric OR main fabric
One 2 1/2" square


Diagonal Strip Sub-unit
Draw a diagonal line on the wrong side of all the 3" x 3" background squares.

Lay the 3" x 3" squares right sides together on top of the 3" x 5 1/2" strips as shown in the photo. All the diagonal lines should be going the same direction!
Sewn along the drawn line.

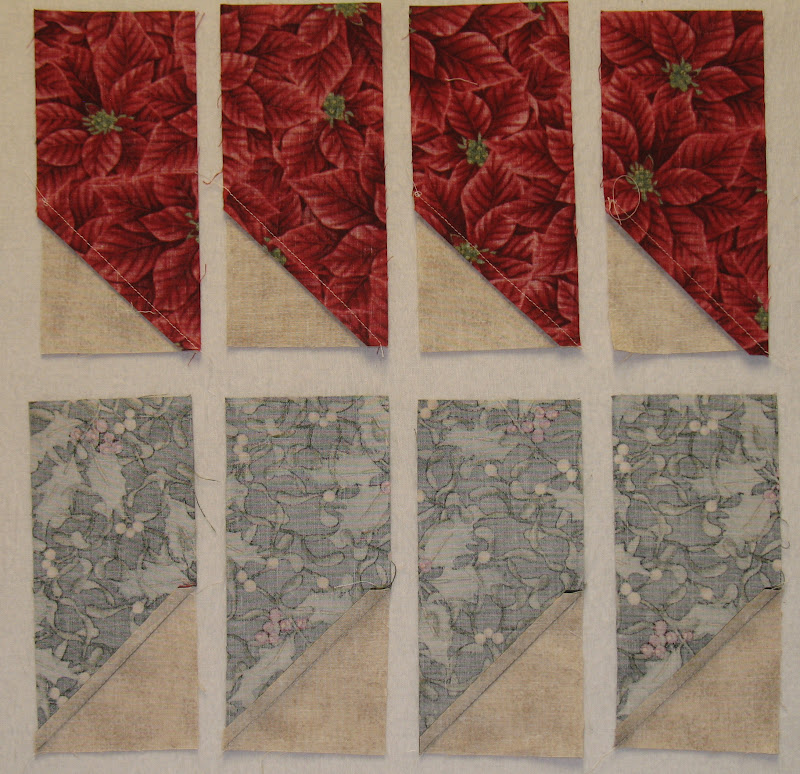
Trim 1/4" on the outside of the sewn line, throw away (or save for future project) the triangle with the X in the photo.
Press the triangle towards the light fabric.
Place the another 3" x 3" square on the other end of the strip, sew along the drawn line, and trim 1/4" away from stitching. (The camera ate the other half of the photo or you would see (4) diagonal strip pieces!)
Throw away the triangle with the X in the photo.
Press this seam towards the dark fabric.
On the back of these strips you should have one seam pressed towards the center of the sub-unit and one seam pressed towards the corner.
If you don't press the seams as directed, nothing bad will happen! It will just make a bulky seam later on. If you press this way, the seams on the flying geese sub-units will nest with the diagonal strip sub-units. Nesting seams make it more accurate when sewing sub-units together, too. (Here's a link with a great photo and explanation of nesting seams: Nesting Seams.)

This is what your 'sew, trim and flip' diagonal strip sub-unit will look like. Sometimes this method is faster and easier than using two half-square triangles to get the same design. It's especially helpful when you have a place in your block that you don't want a seam.

Flying Geese Sub-unit
I used this method to make (4) Flying Geese sub-units from the 8" x 8" square of background fabric and the 6 1/2" x 6 1/2" square of main fabric. (The measurements in the link are different than the ones here! But the method is the same.)

Another tutorial using the same method is found at Krista Quilts. Her tutorial explains the math and how to get the exact size you need. Don't worry, the math isn't hard!

Your flying geese sub-units should measure 5 1/2" x 3", which is the same size as your diagonal strip sub-unit.

Lay all the pieces of your block out so you can see if everything is lining up correctly. I should have chosen a different part of the fabric for the center square, the cut I made was too much like the rest of the fabric and won't show up well in the final block. Oh, well!
I stack all my diagonal strip sub-units and all my flying geese sub-units up so that I can chain sew them together. If I stack them exactly the way I am going to sew them, I usually manage to sew them in the right orientation!
Note: I should have had another photo here to show you which end of the diagonal strip sub-unit matches up with the flying geese sub-units. The seam on the left of the diagonal strip is pressed towards the green because the seam on the flying geese sub-unit is pressed towards the background fabric. Nesting seams! yay!

You can press the corner unit seams in whichever direction they want to fall. It doesn't matter because the next piece they will be sewn to is a strip without any seams.

Putting The Block Together 

You don't have to lay everything out, but I tend to get interrupted (or listening to closely to my book on tape) and sew pieces in all screwy. Although I am really good a ripping out seams, I don't enjoy it all that much!

All the corner units are sewn and pressed, and then laid out on my flannel board in the right orientation for sewing.
I flip the center column of pieces over the left column of pieces and strip piece them into three units.
Pressing correctly here makes a difference, press all the seams towards the strips.
Lay the final three units on top of the center column that you just sewed.
This photo shows how each of the seams in the columns are pressed towards the strips (in my block they are green). Pressing this way makes the seams nest nicely so it's easier to sew the final two seams and get crisp corners.
Sew the last three columns together (two seams), nesting the seams to reduce bulk and get nice, crisp corners.

Press the final two seams in whatever direction you want.
My block turned out exactly 12 1/2" square! No trimming needed {smiles}.

Please feel free to email me directly with any questions, or leave a comment and I'll answer it here.