I usually have 12 or more blocks in a quilt. Since our Block of the Month Group is only planning on 9 blocks, I decided to add a few of my own blocks.
 |
| Eight Pointed Star |
I first learned this technique at
Quilt, Etc. I choose this method if I have a large print for my star. I don't want to break up the large print with a seam through the middle of one of the points. Another method of making this star uses half-square triangles (leave a comment if you would like a tutorial on that method).
This is not a 'no waste' method of making stars. This is a very accurate method, but there is alot of waste. I get creative and use the extra pieces on the back of the quilt or in the border.
In order for this pattern to work you also have to have a small print or a solid for the background fabric. If you have a busy background print you will see the seams more clearly.
As always, the seams are a scant 1/4".
Cut from background fabric
(A1) eight 4" x 6 1/2" rectangles
(A2) eight 3" squares
Cut from color 1 (red)
(B) four 3 x 6 1/2" rectangles
Cut from color 2 (green)
(C) four 3 x 6 1/2" rectangles
 |
| Everything cut out. |
 |
| Draw a diagonal line on the wrong side of each square background (A2) |
 |
| Place a background square (A2) right sides together on each 3 x 6 1/2" rectangles (B, C). |
 |
| Make sure the diagonals slant towards the right on one fabric and to the left on the other fabric. In my photo the squares (A2) slant towards the right on my red (B) fabric and to the left on my green (C) fabric. Pin so the square doesn't shift while you are sewing. |
 |
Sew along the diagonal line on each square. I usually chain sew all eight sub-units,
one piece after another. |
 |
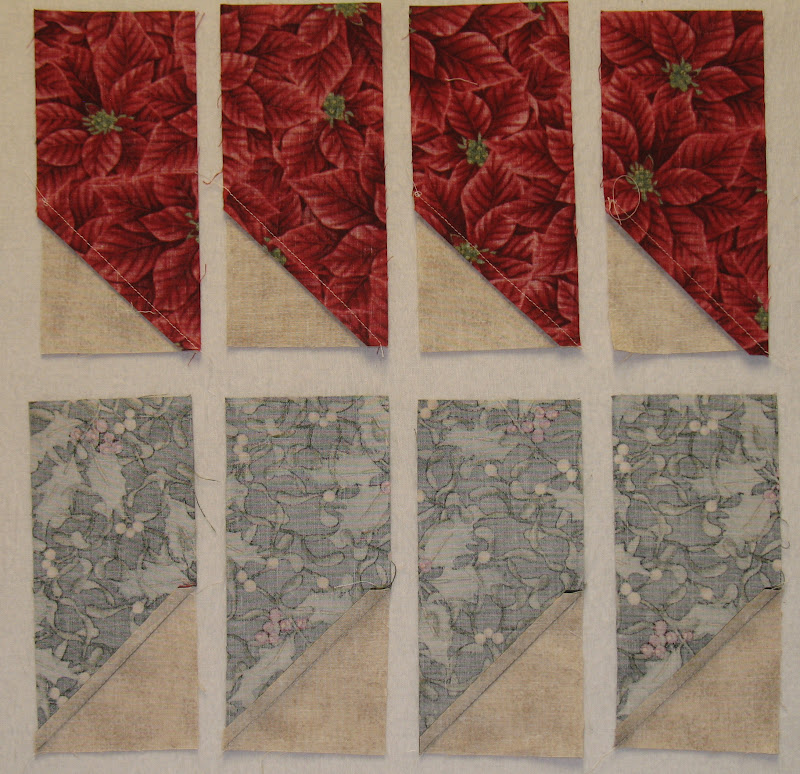
| Trim 1/4" to the right of the sewn line on all eight pieces. |
 |
| Ready to cut. It's hard to see, but the two corners of the square and the drawn line are under the 1/4" line of the ruler. |
 |
| This is what your sub-unit will look like when it's trimmed. |
 |
| Press one color towards the background fabric (A) and one color towards the colored fabric (B or C). |
Eleanor Burns is always very careful about pressing. Reading her books and watching her videos has taught me to think through the pressing process so that I have the least amount of bulk in the seam allowances. It also allows seam nesting, which makes for better points.
 |
| I pressed my AB sub-units towards the background (A) and my AC sub-units towards the green (B) fabric. |
 |
| Using your AB and AC sub-units place an A1 unit (4 x 6 1/2" background) fabric on the LONG edge of the colored fabric. See the photo above. |
 |
| Sneak peak! I pushed the unsewn pieces from the above photo together and placed paper over the parts that will be trimmed away just to see if I had everything lined up correctly. |
Sew the AB and AC sub-units to the 4"x 6 1/2" rectangle.
Press the seam towards the red (B) fabric, and towards the background (A) fabric on the units with green (C) fabric.
 |
| Get your blocks ready to sew the next seam. It's really starting to look like a star now! |
Place one unit right sides together with another, nest the seams and pin where the seams nest to keep them from shifting while you sew.
 |
| I place my sewn units like this on the pressing board so that I remember to press one seam up and one seam down. This press is important because it will allow you to nest the center seam of the star. |
Place both halves of the block together and nest the seams, especially the seams at the center of the star, pin in place and sew the last seam.
 |
| I press on the wrong side so I can swirl the center seam and reduce the bulk. Then I turn it over and do a final pressing on the front. |
|
| Final block from the right side. |
I love stars! They are also one of my most challenging blocks because I am always trying to avoid cutting off the points. If my cutting and seams aren't accurate--I loose points every time.
As always, you are welcome to leave a question in the comments if I haven't explained something clearly enough.


Just wanted to say thanks for posting this tutorial. The instructions were easy to use and my 8-pointed star quilt was so much fun to make!
ReplyDeleteThanks for stopping by! And I'm so glad the instructions were easy to use! That's my goal!
ReplyDeleteСпасибо, ввсё отлично!!!!😍
DeleteI'm sorry if I'm missing it but what size does this block finish at?
ReplyDeleteAll the blocks are 12" finished size (in the quilt), 12 1/2" unfinished.
ReplyDeleteso, how many yards of fabric are needed for each of the three fabric choices?
ReplyDeleteI don't have a yardage requirement for the fabric choices because I used scraps from my stash. I've got another quilt started and will begin posting tutorials for blocks again. I'll let you know how much fabric is needed for each individual block.
ReplyDeleteI love this Christmas block!!!!!!!!!!!! poinsettias are one of my favorite plants. Thank you so much for shearing this block
ReplyDeleteSo happy you enjoyed it!
ReplyDeleteI love this block and worked it up in the same color scheme. I am making a beautiful table runner with three stars. Thanks so much for your detailed instructions.
ReplyDeleteI just love the design. Can't wait to try this. Maybe after all my Christmas stuff that is already scheduled.
ReplyDeleteThanks
This is so simple I almost over thought the process. I'm fairly new to quilting, and have made stars the hard way, with Y seams.
ReplyDeleteThis technique is fantastic! Thank you for sharing.
Thank you for sharing! I love the star blocks. You made it simple, thank you again
ReplyDeleteLoved making this block in punk and purple for Advent! Thank you for sharing this tutorial!
ReplyDeleteLove your tutorial. My daughter is trying to do the same, but to a finished 6” square. Have any tips on how we can figure out measurements of each cut piece to end up with a finished 6” square?
ReplyDeleteEu adorei este tutorial!
ReplyDeleteThank you for posting these instructions. This made the process so easy, instead of the alternative. Only drawback was the loss of extra material. If you cut carefully, you can make a useable star square
ReplyDelete